Locally install a License in image 6.0
Objectives
An XPI License file enables the use of a specific XPI on a specific device. License files are generated based on the device MAC address by Chip PC Licensing Center. This article provides a step-by-step description of local XPI license installation in image 6.0.x.
Procedure
General
- Licenses can be purchased online from Chip PC's website through a credit-card transaction.
- Customers can also contact us directly or trough your local reseller to order licenses.
- Once you purchase the relevantlicense, a license file (*.lic) will be emailed to you.
License Installation Cycle:
- Receive the license file(s) (*.lic) from Chip PC or your local reseller by email.
- Extract and deploy the XPI License files to an FTP server by using the Chip PC Installer utility.
- Perform local/remote (via Xcalibur XP) license installation.
The XPI License installation process is performed by connecting the device to an FTP server and downloading the selected license files.
License Installation Prerequisites:
- License files must already be placed on the FTP server by the Chip PC Installer utility.
Local License Installation Steps:
- Go to Start -> Settings -> Device -> WBT Setup -> Licensing tab
- Click the New License button – The License(s) Install Wizard will open.
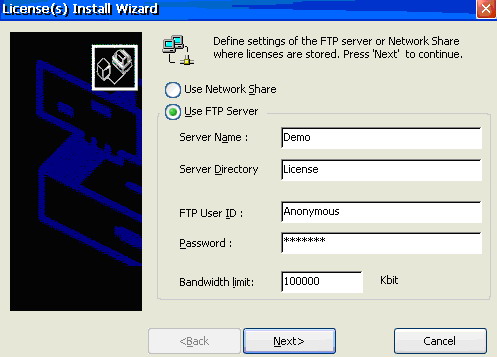
Use FTP Server:
Enter your FTP details and credentials:
- Server Name: type either the FTP server name or IP address.
- Server Directory: type the path to the target directory on the FTP server into which license files were extracted by the Chip PC Installer utility.
- FTP User ID + Password: Provide user credentials for FTP authentication.
- Bandwidth limit: define the download speed.
Click the Next button to continue.
Use Network Share:
Note: To enable a network share in image 6.0 you must have the "Network Share (EX v.6)" license installed.
- Go to Start -> Settings -> Device -> WBT Setup -> Network ID tab
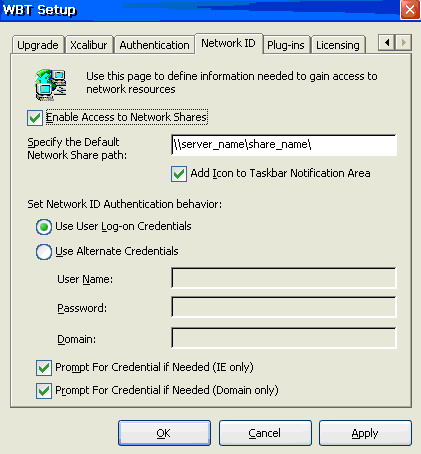
- Check the "Enable Access to Network Shares" and type the default network share path (\\Computer name\Share name\).
Note: Computer name must be used when entering the default network share path – IP address will not be accepted. - This path will be used as the default network share by the local OS from now on.
- Check "Add Icon to Taskbar Notification Area" to add a quick access icon.
Note: To view the taskbar you must first enable it by going to the Plug-ins tab, selecting the "Desktop Interface" plug-in and clicking Configure. In the Desktop Properties dialog go to the Taskbar tab and select "Show 'System Tray'". Restart the device for the changes to take effect. - Set Network ID Authentication behavior determines how the device performs user-level authentication while accessing the Default Shared Folder.
Specify whether the device should use the Logged-On user credentials or Alternative Credentials. - Prompt for Credential if Needed (IE Only) triggers the device to prompt for alternate user credentials incase the ones defined do not match while browsing a web site.
- Prompt for Credential if Needed (Domain Only) triggers the device to prompt for alternate user credentials incase the ones defined do not match while browsing for a network resource (e.g. Shared Folder).
Note: In case "Prompt for Credentials if needed…" options are not selected.
No error message or prompt will be displayed to users in logon failure events. - Restart the device for the changes to take effect.
- After clicking the Next button in the License(s) Install Wizard dialog the following dialog appears:
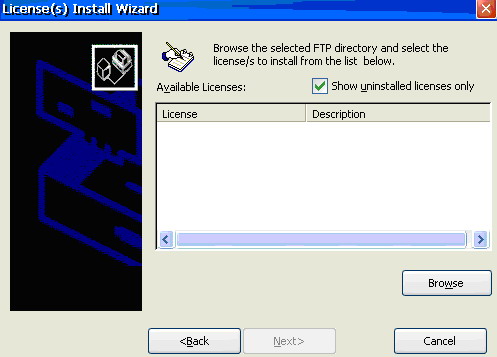
- Click the Browse button to retrieve the available license(s) list from the FTP server or Network Share.
Note: If you choose to use a Network Share you will be prompted for credentials when you click Browse.
- Select the license(s) you wish to install from the Available Licenses list and press Next to continue.
- Click the Install button and wait for download to be completed.
- Click Finish to close the Installation Wizard.
- Reboot the device.