This document will teach you how to use Xcalibur Global to set a password for protecting the client device settings.
The method taught will be based on the following steps:
Select the OU containing the target device.
Create an Xcalibur Policy that is linked to the selected OU.
Configure the Xcalibur Policy to set a password protecting the client device settings.
Applicable Product Version
Xcalibur Global Version 1.1. Rev.2
Procedure
Select the OU containing the target device
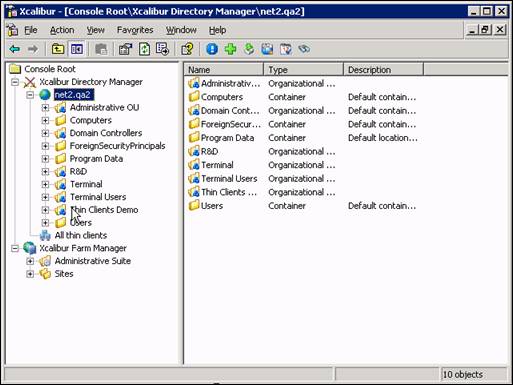
The OU in our example is Thin Clients Demo.
Launch the Xcalibur Global Management Console: From the Task Bar select: Start \ Programs \ Xcalibur Global 1.1 \ Management Console.
Browse the Xcalibur Directory Manager to locate the OU Thin Clients Demo: Expand the path: Xcalibur Directory Manager \ net2.qa2.
Select the OU Thin Clients Demo.
Create an Xcalibur Policy That is linked to the selected OU
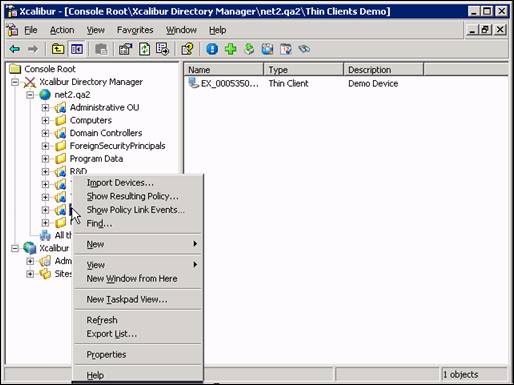
Right-click on the OU (Thin Clients Demo) to display the following drop-down menu:
Select Properties from the drop-down menu to display the OUproperties screen.
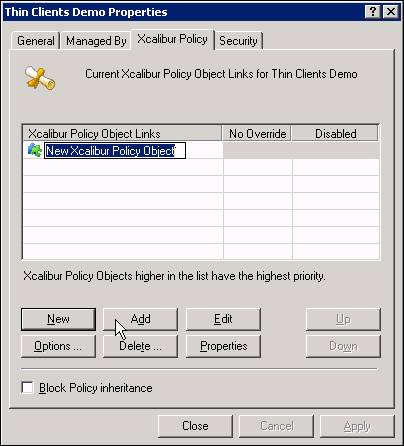
Select the Xcalibur Policy tab.
Click the New button and select TC Policy from the drop-down menu to create a New Xcalibur Policy Object that will appear in the Xcalibur Policy Object Links column.
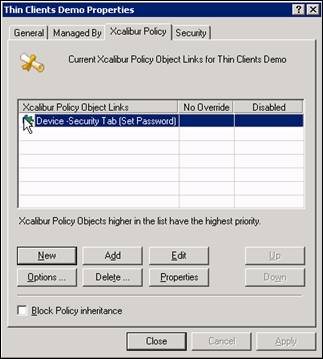
Enter a new name for the policy. In this example we will be using the name Device – Security Tab (Set Password). Press Enter.
Configure the Xcalibur Policy to set a password protecting the client device settings
Select the Xcalibur Policy.
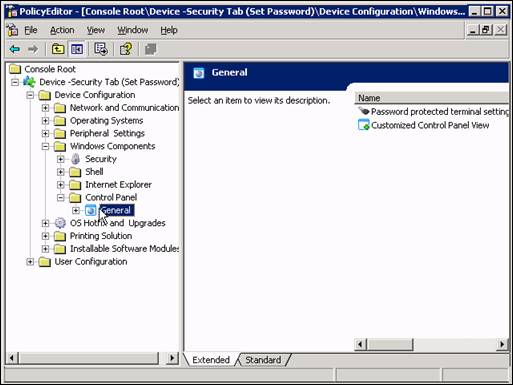
Click Edit to open the Policy Editor. Expand the followingpolicy branch: <policy name> \ Device Configuration \ Windows Components \ Control Panel \ General
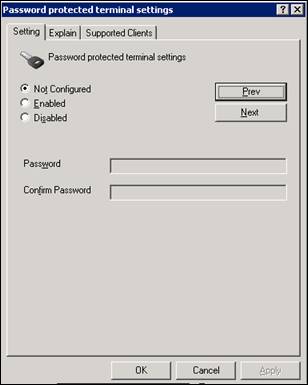
Double-click the Password protected terminal settings to open its configuration screen.
Select Enabled.
Enter the desired password into the Password and Confirm Password fields.
Click OK to return to the Policy Editor screen.
Close the Policy Editor screen to return to the OU properties screen.
Click Close to return to the Xcalibur Global Management Console screen.
Conclusion
You now have an Xcalibur Policy that sets a password protecting the client device settings.
The policy is linked to the OU that was selected.
The policy will affect all devices within the OU and any child OUs (as long as there are no restrictions on policy inheritance).