How to Use Hot Keys and Key Mapping on the Client Device
Objectives
This document teaches how to access and use hot keys and key mapping options on the client device. These features are configurable in three different environments:
- The local device desktop environment
- The RDP client environment
- The ICA client environment
Applicable Product Version
Chip PC client device, firmware Version 6.5.3.
Desktop Environment - Hot Keys
The following tables detail the hot key combinations that are available in the local device desktop environment:
| Hot Keys - Available in all firmware versions |
| ALT + TAB | Switch between open windows |
| CTRL + ALT + DEL | Opens the “Task Manager”. |
| Win + C | Opens the “WBT Configuration”. Equivalent to task-bar navigation: Start\Settings\Device |
| Hot Keys - Available only in firmware version 6.5.3 and later |
| Win + T | Opens the “Desktop Properties”. Equivalent to task-bar navigation: Start\Settings\Desktop |
| Win + X | Opens the “Xcalibur Client Setup”. Equivalent to task-bar navigation: Start\Settings\Xcalibur |
Desktop Environment - Key Mapping
To configure Key Mapping in the local device desktop environment perform the following procedure:
- From the desktop task-bar, open the “Desktop Properties” window by selecting Start \ Settings \ Desktop.
- From the “Desktop Properties” window two key mapping options are available:

The following table explains the Key Mapping options that are available from the local device desktop environment:
| Key Mapping |
| Map CTRL+ALT+INSERT to CTRL+ALT+DEL in session | If checked, this option maps the CTRL+ALT+DEL combination into the session. In its place, the CTRL+ALT+INSERT combination applies on the local device desktop environment. |
| Set toggling key combination to CTRL+ALT+UP/DOWN | If checked, this option allows toggling between the local desktop and all open sessions by using the CTRL+ALT+UP/DOWN key combination. |
RDP Client
When configuring an RDP connection on the client device, you can select the method in which Hot Keys are applied.
The following table explains the different methods available for applying Hot Keys (key combinations) in an RDP connection environment:
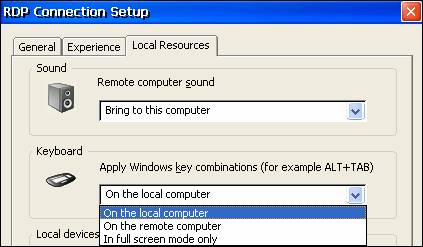
| Hot Keys – Method of Application |
| On the local computer | The Hot Keys are applied on the local desktop of the client device. |
| On the remote computer | The Hot Keys are applied on the remote computer's desktop (i.e. in the session). |
| In full screen mode only | The Hot Keys are applied on the remote computer's desktop, but only when working in full screen session mode. |
To configure the method an RDP connection will use when applying Hot Keys, perform the following procedure:
- From the desktop task-bar, open the “My Connections” window by selecting Start \ Settings \ My Connections.
- From the “My Connections” window, open a drop-down menu by right-clicking on an existing RDP connection.
- From the drop-down menu, open the “RDP Connection Setup” window by selecting Properties.
- From the “RDP Connection Setup” window, open the “Local Resources” tab.
- From the “Local Resources” tab, select a Hot Key application method by using the drop-down list in the Keyboard section, as illustrated.
- From the “Local Resources” tab, complete the procedure and exit the “RDP Connection Setup” window by clicking on the OK button.
Note: Although the procedure detailed above is performed on a pre-existing RDP connecting, the same settings can be applied when creating a new connection.
ICA Client
When configuring the ICA client, Hot Key and Key Mapping settings are available on two levels:
- Global ICA client settings – affects all ICA connections.
- ICA Connection settings – affects only the particular connection
Note: The Global settings allow you to define the default Hot Keys for all ICA sessions. The connection settings, however, let you define a per session behavior, thus allowing for a more customized experience. When conflicting settings exist, the ICA Connection settings have priority over the Global ICA client settings.
Global ICA Client Settings
To access the Global ICA client settings perform the following procedure:
- From the desktop task-bar, open the “Plugins” tab within the “WBT Configuration” window by selecting Start \ Settings \ Plugins.
- In the “plugins” tab, select the “Citrix ICA Connection” from the list of available plug-ins.
- In the “plugins” tab, open the “Citrix ICA Connection Plug-in” window by clicking on the Configure button.
- In the “Citrix ICA Connection Plug-in” window, open the “Misc” tab.
- In the “Misc” tab, open the “Global ICA Client Settings” window by clicking on the ICA Global button.
- In the “Global ICA Client Settings” window, two tabs contain relevant settings:
- The “Keyboard Shortcuts” tab, which enables the creation of Hot Keys that apply only within the ICA session.
- The “Preferences” tab, which allows the selection of the method used when applying Hot Keys (to client or to session).
In the “Keyboard Shortcuts” tab, eight functions can be assigned Hot Keys. A list box for selecting the function’s Hot Key appears next to each function name, as illustrated.
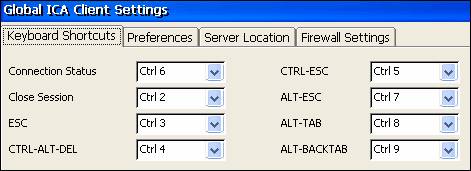
The following table lists the available functions and possible Hot Key values:
| Hot Keys – Global ICA Client Settings – Keyboard Shortcuts |
| Available Functions | Available Hot Key Values |
| Connection Status |  Ctrl 0 Ctrl 0
Ctrl 1 Ctrl 2 Ctrl 3 Ctrl 4 Ctrl 5 Ctrl 6 Ctrl 7 Ctrl 8 Ctrl 9 Disabled |
| Close Session |
| ESC |
| CTRL-ALT-DEL |
| CTRL-ESC |
| ALT-ESC |
| ALT-TAB |
| ALT_BACKTAV |
In the “Preferences” tab, you can select the method used when applying Hot Keys. This is configured by selecting the method from the drop-down list that is located next to the field titled “Apply Windows key combinations”, as illustrated.

The following table explains the different methods available for applying Hot Keys (key combinations):
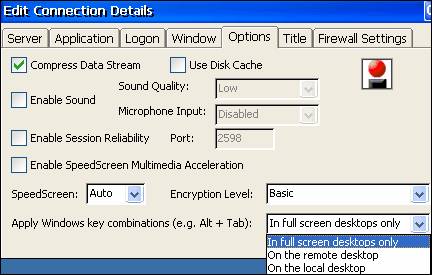
| Hot Keys – Method of Application |
| On the local computer | The Hot Keys are applied on the local desktop of the client device. |
| On the remote computer | The Hot Keys are applied on the remote computer's desktop (i.e. in the session). |
| In full screen mode only | The Hot Keys are applied on the remote computer's desktop, but only when working in full screen session mode. |
ICA Connection Settings
To configure the method an ICA connection will use when applying Hot Keys, perform the following procedure:
- From the desktop task-bar, open the “My Connections” window by selecting Start \ Settings \ My Connections.
- From the “My Connections” window, open a drop-down menu by right-clicking on an existing ICA connection.
- From the drop-down menu, open the “Edit Connection Details” window by selecting Properties.
- From the “Edit Connection Details” window, open the “Options” tab.
From the “Options” tab, select a Hot Key application method by using the drop-down list that is located next to the field titled “Apply Windows key combinations”, as illustrated.
- From the “Options” tab, complete the procedure and exit the “Edit Connection Details” window by clicking on the OK button (located in the top right corner).
- Although the procedure detailed above is performed on a pre-existing ICA connecting, the same settings can be applied when creating a new connection.