How to Use Customized System Screens Plug-In in image 6.0
Objectives
This document explains how to locally use and configure the Customized System Screens XPI for image 6.0.
Procedures
The Customized System Screens XPI (Xtreme Plug-In) allows you to add / change the following:
- Screen saver image
- Wall paper image
- Splash screen image (the blue Chip PC logo picture displayed first during boot)
The Customized System Screens XPI can be downloaded from the Chip PC website, plug-ins section, under the Misc. category.
Please Note:
This XPI requires a license. Licenses can be purchased 24/7 through Chip PC's on-line licensing system.
Before you begin:
- Download the Customized System Screens XPI for your device.
- Install it on the device (locally or via Xcalibur XP management software)
- Install its license (locally or via Xcalibur XP).
Splash Screen prerequisites:
- The file must be in BMP (Windows Bitmap) format.
- The BMP resolution must be 640 by 480 pixels.
- The BMP must be 256 colors.
- Picture size can be up to 302Kb
- The color of the bottom left pixel determines the color of the progress bar
Files that don't meet these prerequisites will be rejected.
Note: Once replaced, the splash screen will remain, regardless of resets to factory defaults.
Screen Saver and Wallpaper prerequisites:
- The file must be in BMP (Windows Bitmap) format.
- The file may be in any resolution and color depth.
Note that the bigger the resolution and color depth, the bigger the file size.
- Wallpaper - It's recommended to use images with a resolution the same size as the screen resolution.
- Pay attention to the file size and the remaining disk space on the device.
How to use Customized System Screens XPI locally:
- Go to: Start -> Settings -> Device -> Plugins tab
Select the "Customized System Screens" plug-In and click the configure button.
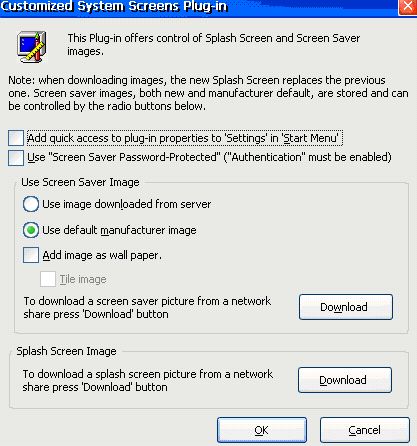
How to replace the image?
You must have access to a network share, from which the images will be imported.
- Please go to WBT Setup –> Network ID and check the “Prompt for credentials if needed (Domain only)”.
- Copy the images to a network share.
- Click the “Download” button to open the “Download Bitmap” dialog.
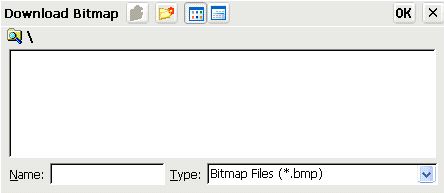
- Type the path to the network share, on which the files are located, in the "Name" area.
- Select your desired image and click OK.
- Repeat the process for each image you wish to add.
Important notes:
- Use only NetBIOS names (\\server_name\share_name) as a path to the shared folder. Direct IP is NOT supported due to Windows CE limitation.
- Both Xtreme PC and the server that hosts the Bitmap files must be registered in the WINS database.