Locally install Xtreme Plug-ins using a network share in image 6.0
Objectives
This document explains how to locally install Xtreme plug-ins on a device with image 6.0 using a Network Share.
Procedures
Before you begin:
- Make sure you have the Plug-in Pack files that correspond to your device hardware model and current firmware.
- The files can be downloaded from our website: http://www.chippc.com/
- The Plug-in files that are obtained from Chip PC should be extracted using Chip PC Installer.
- You MUST read How to use the Chip PC Installer to better understand how to extract the Firmware files to an FTP server using the Chip PC installer utility.
This manual and the Chip PC Installer can be downloaded from our download section on this website.
Enable a Network Share:
Note: To enable a network share in image 6.0 you must have the "Network Share (EX v.6)" license installed.
- Go to Start -> Settings -> Device -> WBT Setup -> Network ID tab
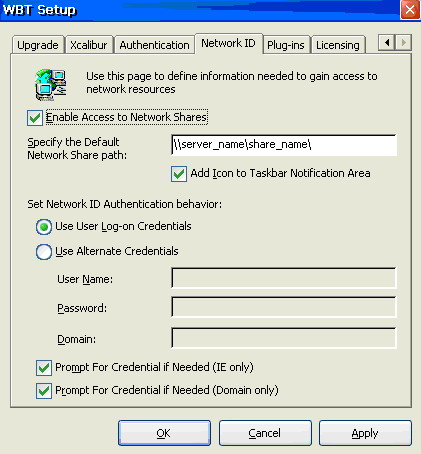
- Check the "Enable Access to Network Shares" and type the default network share path (\\Computer name\Share name\).
Note: Computer name must be used when entering the default network share path – IP address will not be accepted. - This path will be used as the default network share by the local OS from now on.
- Check "Add Icon to Taskbar Notification Area" to add a quick access icon.
Note: To view the taskbar you must first enable it by going to the Plug-ins tab, selecting the "Desktop Interface" plug-in and clicking Configure.
In the Desktop Properties dialog go to the Taskbar tab and select "Show 'System Tray'". Restart the device for the changes to take effect. - Set Network ID Authentication behavior determines how the device performs user-level authentication while accessing the Default Shared Folder.
Specify whether the device should use the Logged-On user credentials or Alternative Credentials. - Prompt for Credential if Needed (IE Only) triggers the device to prompt for alternate user credentials incase the ones defined do not match while browsing a web site.
- Prompt for Credential if Needed (Domain Only) triggers the device to prompt for alternate user credentials incase the ones defined do not match while browsing for a network resource (e.g. Shared Folder).
Note: In case "Prompt for Credentials if needed…" options are not selected.
No error message or prompt will be displayed to users in logon failure events. - Restart the device for the changes to take effect.
Installing a Plug-In:
Make sure the plug-in packages are present on the Network Share you wish to work with.
- Go to Start -> Settings -> Device -> WBT Setup -> Plug-ins tab

Plug-ins general notes:
- After installing a plug-in it will appear in the Available Plug-ins list with an empty square.
- To activate the plug-in, left click the square ones. The plug-in is now active and can be worked with.
An active Plug-in is marked with a V in the square. - You may also Lock/Unlock plug-ins – this option applies when you perform software reset to factory default setting.
Plug-ins selected and marked as Lock (Capital L in the square) will not be removed from the device even if the "Remove Plug-ins" option of the reset process is selected. In addition, to delete a plug in from the device you first have to unlock it.
Please refer to the Image 6 manual for more information.
How to install a plug-in:
- Click the New button
- The Plug-ins Installation Wizard will open
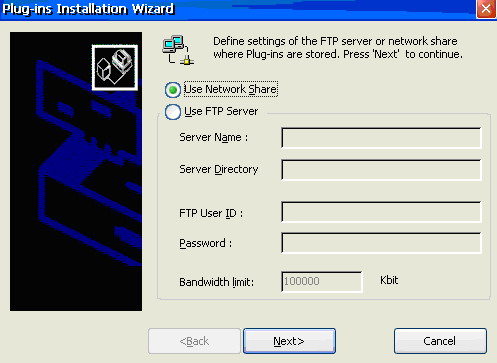
- Select the option "Use Network Share", as shown above.
- Click Next when ready.
- Click the Browse button in the next window to see the available plug-ins.
Note: You may be asked to provide user credentials to access the network share
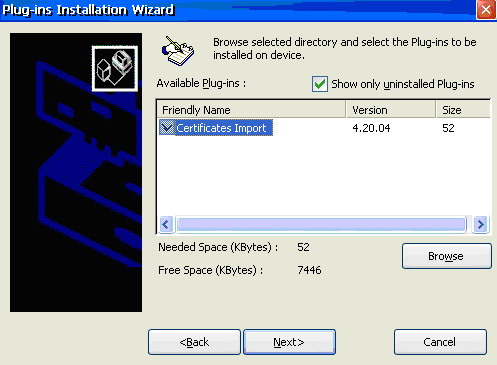
- The option Show only uninstalled plug-ins is checked by default
Uncheck it to view plug-ins that are already installed - Select the plug-ins you wish to install (as demonstrated above)
- Note the Needed Space and Free Space parameters
Make sure you have sufficient free space to install the plug-ins - Click Next when ready and Install in the next window
- Follow the onscreen instructions and finish the process
- The new plug-ins will appear in the Available Plug-ins view of the Plug-ins tab.
- Restart the device when asked to.
- To install from a different source read the following KB document:
How to locally install Xtreme Plug-ins using an FTP Server in image 6.0