Use customized system screens plug-in in image 6.5.x
Objective
This document explains how to use the Customized System Screens XPI both locally and through the Xcalibur Global management software.
Procedures
The Customized System Screens XPI (Xtreme plug-in) allows you to change the following:
- Screen saver image
- Logo image (used during boot)
- Wall paper image
- Splash screen image (the blue Chip PC logo picture displayed first during boot)
The Customized System Screens XPI can be downloaded from the Chip PC website, plug-ins section, under the Misc. category.
Please Note:
- This XPI requires a license.
- Time limited licenses (e.g. evaluation) work only with Xcalibur Global
- Only an unlimited (permanent) license can be configured locally
Before you begin:
- Download the Customized System Screens XPI for your device.
- Install it on the device (locally or via Xcalibur global)
- Install its license (locally or via Xcalibur global)
Please refer to the Image 6.5.x manual or to our online Knowledge Base for detailed instructions on how to install XPI files and License files.
Splash Screen prerequisites:
- The file must be in BMP (Windows Bitmap) format.
- The BMP resolution must be 640 by 480 pixels.
- The BMP must be 256 colors.
- Picture size can be up to 302Kb
- The color of the bottom left pixel determines the color of the progress bar
Files that don't meet these prerequisites will be rejected.
Note: Once replaced, the splash screen will remain, regardless of resets to factory defaults.
Logo Image prerequisites:
- The file must be in BMP (Windows Bitmap) format.
- The default bitmap size is 414 by 72 pixels.
- The BMP must be 256 colors.
- Picture size can be up to 300Kb
Screen Saver and Wallpaper prerequisites:
- The file must be in BMP (Windows Bitmap) format.
- The file may be in any resolution and color depth.
Note that the bigger the resolution and color depth, the bigger the file size.
- Wallpaper - It's recommended to use images with a resolution the same size as the screen resolution.
- Pay attention to the file size and the remaining disk space on the device.
How to use Customized System Screens XPI locally:
- Go to: Start -> Settings -> Device -> Plugins tab
- Select the "Customized System Screens" plug-In and click the configure button.
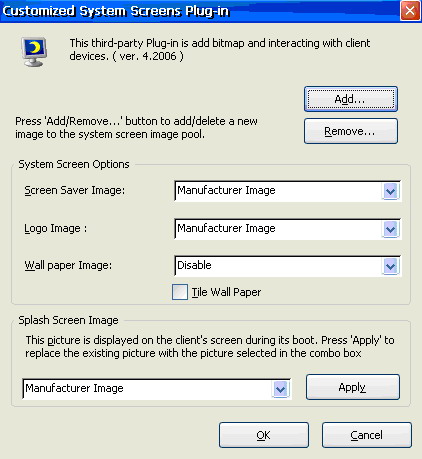
Add and Remove images:
Please read the following article prior to adding images to the device:
How to Enable Access to Network Shares in image 6.5.x
- Copy the images to the network share.
(Make sure they meet the prerequisites described earlier) - Click the Add button to open the "Download Bitmap" dialog.
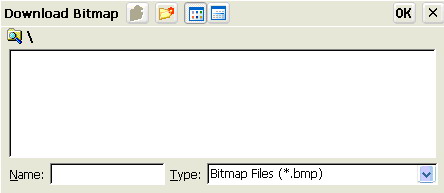
- Type the path to the network share, where the files are located, in the "Name" area.
- Select your desired image and click OK.
- Repeat the process for each image you wish to add.
- Click the Remove button to open the "Delete File(s)" dialog.
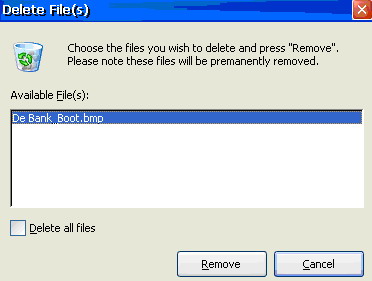
- Select the image file you wish to delete and click the "Remove" button.
- You can check the "Delete all files" box to remove all the files.
System Screen Options:
After adding the images to the device use these options:
- Screen Saver Image - Select the image you wish to use as a screen saver from the dropdown box
- Logo Image - Select the image you wish to use as a logo from the dropdown box
- Wallpaper Image - Select the image you wish to use as wallpaper from the dropdown box
Check "Tile Wallpaper" if you wish to tile the wallpaper image.
Splash screen Image:
- Select the image you wish to use as a splash screen image from the dropdown box
- Click the Apply button for the change to take affect.
How to use Customized System Screens XPI via Xcalibur Global:
To configure this XPI using Xcalibur Global you must use a policy.
Note: The Customized System Screens XPI must be added to the Xcalibur Global software repository before you begin, or it won't appear in the policy dialog (described below). Also, the XPI must be deployed to the devices using an installation policy.
For more information regarding Xcalibur Global policies and how to use them please read the Xcalibur Global manual or visit our Knowledge Base.
Please visit Xcalibur Global Training for the training video: "How to change your system screens".
To add image files to the XPIs repository:
- Go to the Xcalibur Global Software Repository
(under the Xcalibur Farm Manager) - Right click the Customized System Screens XPI and click on Properties
- Go to the Advanced tab and click the "Add new file to the list" button
- The "Import File" dialog will open
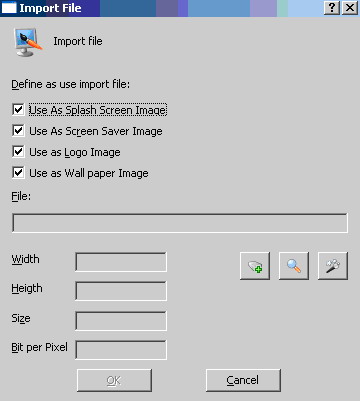
- Add a file from your chosen location
- You can define what the file will be used for using the check boxes
- Click OK when finished
- Repeat the process for each file you wish to add
- All the files will appear in the list area of the Advanced tab
To configure and deploy:
- Create a new policy
- Name it (e.g. Device - Customized System Screens)
- Open the Policy in the Policy Editor and go to:
Device Configuration -> Installable Software Modules -> Customized System Screens - Each configurable option has its own dialog on the right pan (as shown below)
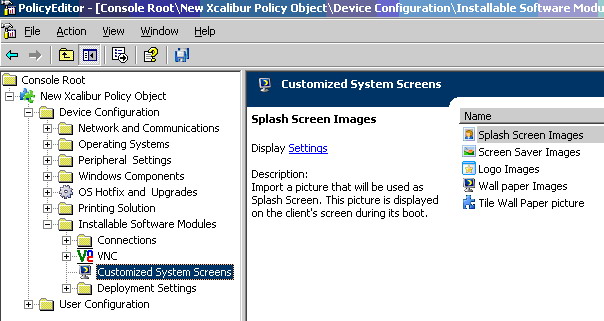
- Select the element you wish to change and double-click it
- The configuration dialog will open
Note: all the dialogs have the same layout
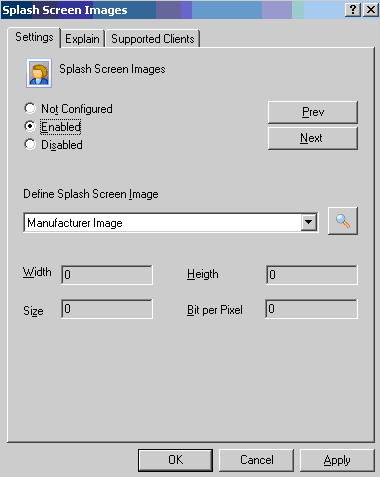
- Check "Enable" to activate this feature
- Select the image you want to use from the dropdown menu
Note: All the images added in the previous section will appear here - Click OK to finish
- Define each dialog according to your needs.
- Confirm all open windows and exit.
- Once the policy is sent to the devices the changes will take effect.