Locally connect, configure and manage printers in image 6.5.x
Objectives
This article provides a complete explanation on how to connect, configure and manage printers locally in image 6.5.x.
This document refers to the Printers and USB Printers tabs in image 6.5.x, which provide an interface from which local/network attached printers are configured and managed.
Procedures
To access the printing related interfaces, go to Start -> Settings -> Device
The WBT Configuration dialog has two tabs through which you can access printing configuration: Printers and USB Printers.
The Printers Tab:
The Printers tab provides access to the COM1, LPT1, SMB1, SMB2, LPR1 and LPR2 ports of the device.
An explanation on each of the features available through the Printers dialog (marked with a red arrow) can be found below.
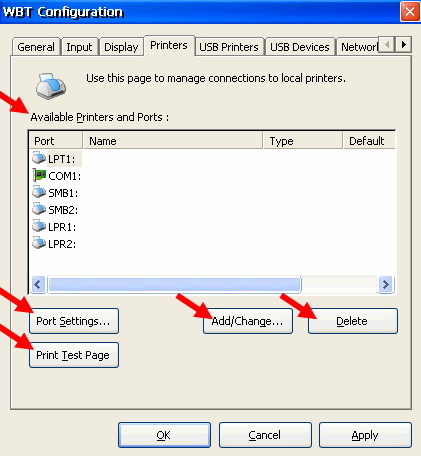
- Choose the port type to which you wish to connect the local printer from the Available Printers and Ports list.
- Pressing Add/Change button will open the screen for defining printer properties.
- Pressing the Delete button removes existing printers.
The Add Printer dialog:
- Check "Make this the default printer" if you wish the current printer to become the default one.
- In case the printer is a standard printer, mark it in the Predefined List Boxes according to Manufacturer and Printer Model.
- You can edit the Friendly Name
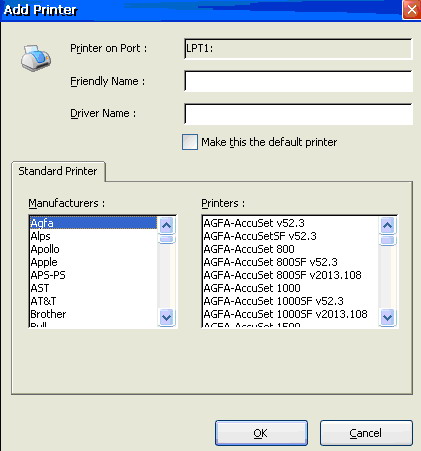
Defining Non-Standard Printers:
Manually type the Friendly name and the Driver Name.
Press OK to accept the new printer or Cancel to return to previous screen without saving changes.
Note:
For a non-standard printer to be recognized by the Chip PC's thin-clients the printer drivers should be installed on the server and the printer manufacturer and model defined locally. Please read How to add a non-standard printer for more information.
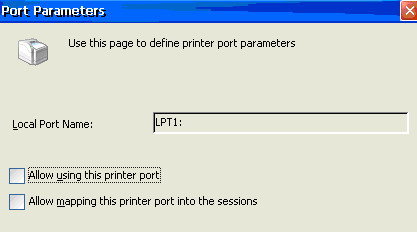
Port Settings:
To access the port settings:
- Select the port you wish to configure
- Press "Port Settings…" button
LPT Port:
- Allow using this port – By checking this checkbox user allow printers to connect to this port
- Allow mapping this port into the sessions – By checking this checkbox user allow to map printers from this port to a session
COM Ports
- Allow using this port – By checking this checkbox user allow printers to connect to this port.
- Allow mapping this port into the sessions – By checking this checkbox user allow to map printers from this port to a session.
COM ports are often used by serial printers, barcode readers and other various serial devices which can be mapped into a terminal session. Controlling port speeds and bound rates provide improved connectivity with locally attached serial devices which may require unique settings for fluent communication.
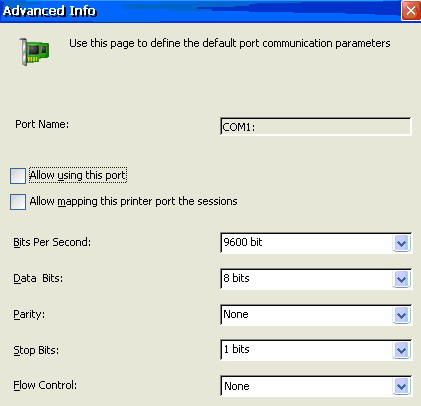
- Bits per Second – Define the maximal bandwidth allocated for the print job
- Data Bits – Changes the number of data bits you want to use for each character that is transmitted and received.
The computer or device you are communicating with must have the same setting that you choose here.
Most characters are transmitted in seven or eight data bits. - Parity – Define whether to use parity as a mechanism to validate the data transfer
- Stop Bits - Changes the time between each character being transmitted (where time is measured in bits per second).
- Flow Control - Changes how the flow of data is controlled.
Xon/Xoff, sometimes called software handshaking, is the standard software method of controlling data flow between two modems.
Hardware flow control, sometimes called hardware handshaking, is the standard method of controlling data flow between a computer and a serial device.
Please Note:
COM port must be enabled on the ICA plug-in for them to be mapped into a session.
Go to: Start -> Settings -> Device -> Plugins tab
Select Citrix ICA Connection from the Available Plug-ins view and click Configure
Under the Settings tab check the option: Enable Connection to COM Ports.
Citrix server side configuration may also be requierd.
SMB Ports
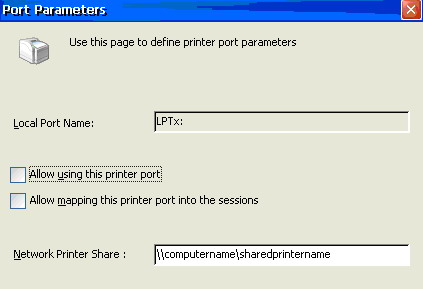
- Allow using this port – By checking this checkbox user allow printers to connect to this port
- Allow mapping this port into the sessions – By checking this checkbox user allow to map printers from this port to a session
- Network Printer Share – Enter your computer and printer name
Note: The SMB option refers to shared printers only.
LPR Ports
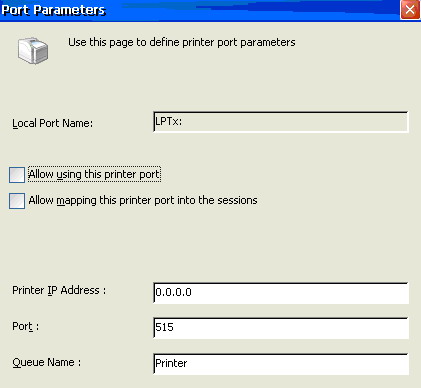
- Allow using this port – By checking this checkbox user allow printers to connect to this port
- Allow mapping this port into the sessions – By checking this checkbox user allow to map printers from this port to a session
- Printer IP Address – Type the Printers IP address
- Port – Define which port is used by the printer (default is 515)
- Queue Name – the queue name given to the printer on the server
Note: LPR capabilities allow printing over TCP/IP only to print servers (LPD) that fully support LPD RFC-1179.
Print Test Page:
In order to verify the accuracy of settings applied on a locally attached printer as well as testing the physical communication between that printer and the device, pressing the Print Test Page button triggers a test page to be printed directly from the device to the printer attached to it. Successful print, suggests device-printer settings are correct.
This feature is ideal for troubleshooting terminal server printer mapping cases, since it immediately indicates whether a printing problem origin is server or client related.
To print a test page:
- Select the printer you wish to print to
- Click on the "Print Test Page" button on the Printers tab
Note: The Print Test Page option is also available under the USB Printers Tab.
tab:
Important note:
The USB ports are partialy disabled by default for security reasons, i.e. connecting some devices is prevented.
Please read How to locally configure USB devices in image 6.5.x to learn how to enable USB printers.
- The USB Printers tab controls the recognition and settings of local USB printers connected directly to the device.
- Press the USB Printers tab to view its content.
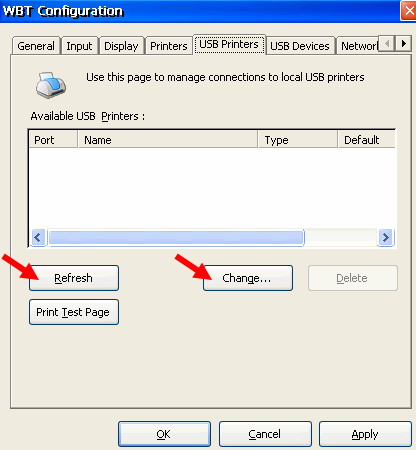
The Available USB Printers frame displays a list of local USB printers, which are connected to the device.
NOTE: The device’s USB ports are Plug & Play ports. Therefore the device detects the USB printer automatically when connected to the port.
Connect a New USB Printer:
- Connect the printer to one of the USB ports. Make sure that the printer is on.
It is preferable that the USB printer will be connected to the device prior to turning the device On, In this case the USB printer will be recognized automatically and mapped to session. - In case the printer is connected once the device is already on, the USB printer will be recognized but the device will have to be restarted to enable mapping of the printer to sessions.
- The printer name will be displayed in the Available USB Printers List. If it is not presented, press the Refresh button.
Change USB Printer Properties:
- Select the printer from the Available USB Printers list and press the Change button.
- This will open the selected printer's properties window.
- The printers Friendly Name and Driver Name appear and can be modified.
- The selected USB printer can be also defined as the default printer.
Important Note:
The Printer Name and Driver Name syntax should be Identical to the one on the server side (i.e. case sensitive - small letters, CAPITAL LATTERS, spaces). If it's not the identical, the printer will not be mapped properly and will not work.