How-To Restore a Thin-Client device to factory default with image 6.5.x Using Software and Hardware Restore
Objectives
Chip PC's thin clients devices have excellent Hardware, Firmware and Management therefore recovery process is unusual to occur. However, in order to recover or prevent unexpected failures, several mechanisms are available.
This document explains how to perform both software and hardware restore to factory default on a device with image 6.5.x.
The method taught for software restore is based on the following steps:
- Access the restore settings on the device
- Choose restore options
- Reboot device
The method taught for hardware restore is based on the following steps:
- Perform action sequence clicks on hardware button.
- Reboot device
Applicable Product
- Firmware version – 6.5.x
- Device Hardware EX / NG
- Device Hardware Jack PC
Restore Options
- Chip PC's device firmware can be restored to default settings as a result of a software or hardware command. This process will result in clearing all device settings and connections and restoring the Operating System to its initial mode.
When to use software restore?
- A software restore may be used when it is necessary to clear all device settings at once. This situation may arise if devices are moved around between different environments running software restore prior to connecting a device to a new environment will clear all previous settings.
- A software restore may also be used for solving Device & Plug-in conflicts, if a device and/or Plug-in settings seem to conflict, a software restore will clear all settings and provide a clean start for device configuration.
When to use Hardware restore?
- A hardware restore should be used whenever software restore is inaccessible. For example a device with miss-configured display settings (e.g. too high screen refresh frequency rate) may result in a clutter of colorful lines or a black screen display. This problem might appear when the monitor does not support the device's screen refresh rate or screen area size defined under the Display Tab. In this scenario, initiating a software restore becomes impossible therefore you can either connect the device to a different monitor or perform a hardware restore.
- Hardware restore can also be used to gain access to a device on which the WBT has been locked with a password, in the event that the password has been forgotten the WBT Setup environment is inaccessible and no changes/maintenance can be performed on the device, a hardware restore will clear the settings including the password protection making the device settings accessible again.
Software Restore:
- Go to: Start -> Settings -> Device -> General tab click the "Restore…" button.

- The Reset Now dialog box will appear
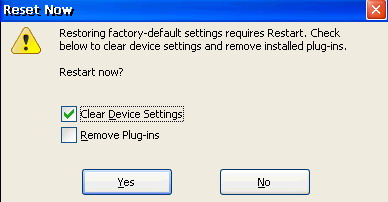
- It is recommended that you do not clear previously installed plug-ins (do not check the “Remove Plug-ins” checkbox option). Plug-ins should be removed for specific reason for example corrupt installation, upgrade etc’.
Hardware Restore & Safe Mode Operation:
- A hardware restore can be initiated by running a certain action sequence once pressing the ON/STBY button. As a result of this procedure, the device boots into a safe-mode state.
What is safe mode?
- Safe mode is an intermediate state into which the device boots as a result of hardware restore. This mode was designed to allow the device to complete its boot in any scenario. In safe-mode only basic Operating System components are loaded, therefore device settings are unchangeable.
- While the device is in safe mode administrators can perform either firmware or hot fix installation. To exit the safe mode, reboot the device.
- As in software restore, all applied device settings (manual and remote) and connections are cleared due to this operation. Additionally, all Plug-in settings are cleared.
- This procedure (deliberately) requires timing and accuracy in order to prevent user activation by mistake. Therefore several retries might be necessary before successfully entering the safe-mode.
EX / NG Restore Procedure
- Power on the Xtreme PC.
The ON/STBY LED will blink (turn on and off). - Press and release the RESTORE button and immediately after, press and hold the ON/STBY button for 3-5 seconds.
- While the ON/STBY button is pressed the ON/STBY LED color will change to ORANGE and then to RED.
- Once the ON/STBY LED turns RED, release the ON/STBY button and immediately press and release and press and hold it.
- Hold the ON/STBY button pressed until the progress bar on the system-splash screen is filled and then release.
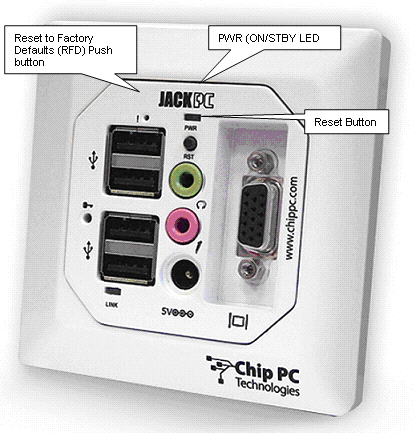
Jack PC Restore Procedure
- Make sure the Jack PC is powered on.
The PWR LED is Green. - Press and hold the RFD Button with the symbol '!' on the Jack PC.
Use a paper clip (or similar tool) to press the “Reset to Default settings” (RFD) button. - Press the black PWR button for 3 seconds (without releasing the RFD button) and then release the PWR button.
- While the RFD is still pressed the PWR LED shortly blinks Green and then changes to Orange and a second later it changes to Red.
- Once the PWR LED turns Red, release the RFD button and immediately press and release and press and hold it.
- Hold the RFD button pressed until the progress bar on the system-splash screen is filled and then release. The local OS will boot with a green background and you'll receive the WBT Setup (Safe Mode) dialog.
- While in safe-mode only basic OS components are loaded therefore device settings are unchangeable.
- Administrators can only perform firmware or hotfix installation during this mode.