Chip PC Thin Clients  
 
     
Support
Support Center
Knowledge Base
Software Downloads
Register Warranty
Request Support
Request RMA
Online Training
Resources
Home > Support > Knowledge Base
How to Create an RDP Connection with Access to Local USB Storage via Xcalibur Global

Last modified: Sunday, Nov 21, 2007 Article ID: 748
Related products: Xcalibur Global Management Software

1. Objectives

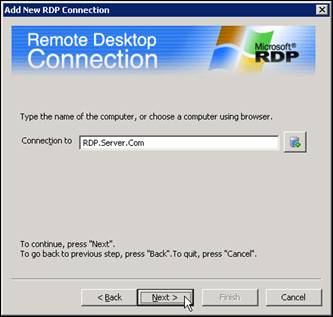
This document explains how to use Xcalibur Global to create an RDP connection with access to local USB storage. When a session is opened using this connection, applications running within the session will be able to access USB storage that is connected to the Thin Client.

This procedure is based on the following steps:

  1. Select the OU containing the target Thin Clients.
  2. Create an Xcalibur Policy that is linked to the target OU.
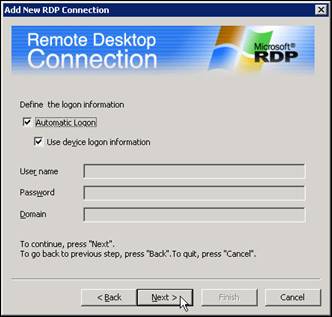
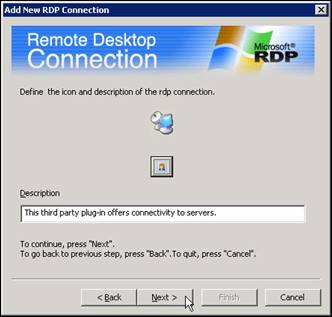
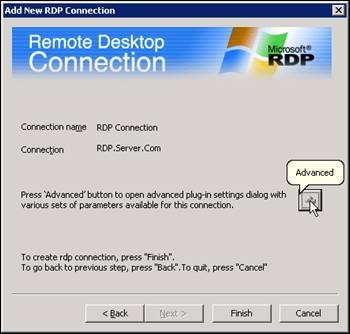
  3. Configure the Xcalibur Policy to create an RDP connection.
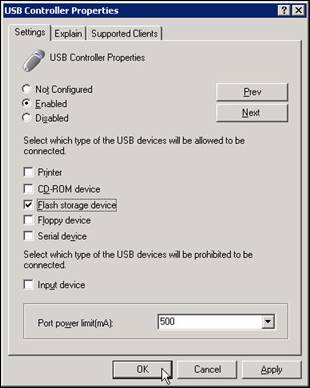
  4. Configure the Xcalibur Policy to enable USB support.

2. Applicable Software Versions

This document is applicable to an environment with the following software versions:

  • Xcalibur Global 1.1 Rev. 2
  • Chip PC Thin Client Firmware 6.5.3

3. Procedure

Select the OU Containing the Target TCs

  1. Launch the Xcalibur Global Management Console by clicking on:
    Start > Programs > Xcalibur Global 1.1 > Management Console.
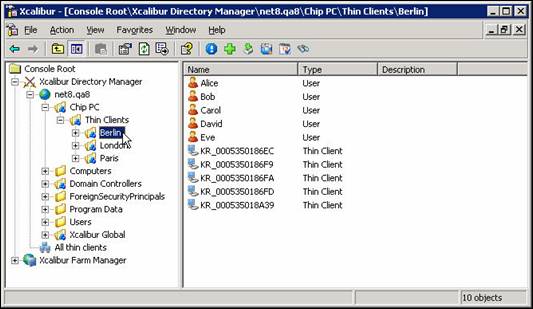
  2. In the Xcalibur Management Console, expand the folders under Xcalibur Directory Manager to reveal the OU that contains the target TCs. In this example expand: Xcalibur Directory Manager \ net8.qa8 \ Chip PC \ Thin Clients.


    Figure 1: Xcalibur Management Console - Select Target OU
  3. In the expanded folders, select the target OU (In this example Berlin).

Create an Xcalibur Policy that is Linked to the Target OU
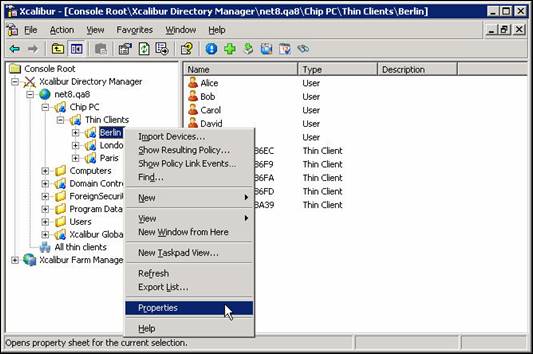
  1. Right-click on the target OU (Berlin in this example) to display a menu.
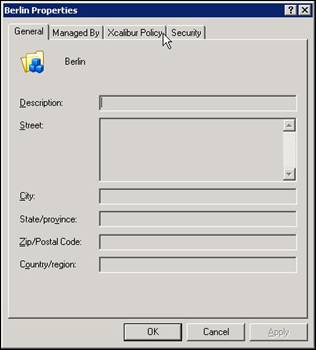
  2. On the menu, click Properties to display the <OU> Properties dialog box.


    Figure 2: Xcalibur Management Console – Target OU > Properties
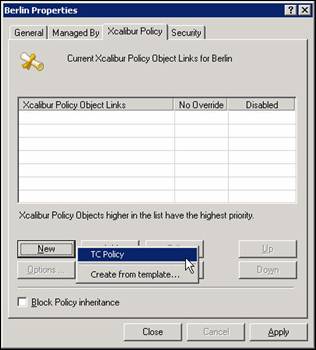
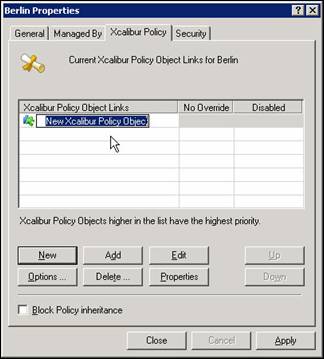
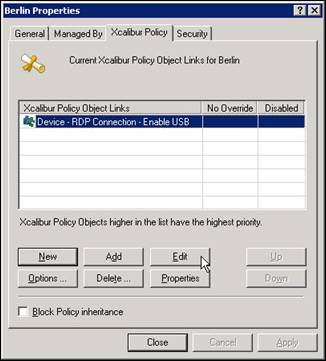
  3. In the <OU> Properties dialog box, select the Xcalibur Policy tab.


    Figure 3: <OU> Properties Dialog Box – Select Xcalibur Policy Tab
  4. In the Xcalibur Policy tab, click New to open a menu.


    Figure 4: Xcalibur Policy Tab – New > TC Policy
  5. On the menu, select TC Policy to create a New Xcalibur Policy Object that will appear in the Xcalibur Policy Object Links column.


    Figure 5: Xcalibur Policy Tab – New Xcalibur Policy Object
  6. Type a new policy name (“Device – RDP Connection – Enable USB” in this example) over the default name “New Xcalibur Policy Object”.

Configure the Xcalibur Policy to Create an RDP Connection

  1. Select the newly created policy (“Device – RDP Connection – Enable USB” in this example) and click Edit to open the Policy Editor window.


    Figure 6: Xcalibur Policy Tab – Edit New Policy
  2. In the Policy Editor window, expand the following path:
    <Policy Name> \ Device Configuration \ Installable Software Modules
    \ Connections
  3. Under Connections, select and right-click Remote Desktop Connection to open a menu.
  4. On the menu, select Add… to run the Add New RDP Connection wizard.


    Figure 7: Policy Editor Window - Installable Software Modules \ Connections
  5. In the Add New RDP Connection - Welcome dialog box:
    1. Type a name for the new RDP connection or leave the default name.
    2. Click Next.


      Figure 8: Add New RDP Connection - Welcome Dialog Box
  6. In the Add New RDP Connection - Computer Name dialog box:
    1. In the Connection to text box, type the IP Address or the name of the RDP server (in this example: RDP.Server.Com).
    2. Click Next.


      Figure 9: Add New RDP Connection - Computer Name Dialog Box
  7. In the Add New RDP Connection - Logon Information dialog box:
    1. Enter the desired logon information.
    2. Click Next.


      Figure 10: Add New RDP Connection - Logon Information Dialog Box
  8. In the Add New RDP Connection - Icon dialog box,
    1. Select the desired icon.
    2. Click Next.


      Figure 11: Add New RDP Connection - Define the Icon Dialog Box
  9. In the Add New RDP Connection Information dialog box, click the Advanced  button.


    Figure 12: Add New RDP Connection Wizard - Information Dialog Box
  10. In the RDP Connection Properties dialog box, select the Local Resources tab.


    Figure 13: RDP Connection Properties Dialog Box
  11. In the Local Resources tab, select the Disk drives check box.


    Figure 14: RDP Server Properties Dialog Box – Local Resources Tab
  12. Click OK to return to the Add New RDP Connection - Information dialog box.
  13. In the Add New RDP Connection - Information dialog box, click Finish to return to the Policy Editor window.


    Figure 15: Add New RDP Connection Wizard - Information Dialog Box

    Configure the Xcalibur Policy to Enable USB Support

    1. In the Policy Editor window, expand the following path:
      <Policy Name> \ Device Configuration \ Peripheral Settings


      Figure 16: Policy Editor Window – Peripheral Port Settings
    2. Under Peripheral Settings, select Peripheral Port Settings
    3. In the right pane, double-click on USB Controller Properties to open the USB Controller Properties dialog box.
    4. In the USB Controller Properties dialog box, perform the following:
      1. Select Enabled
      2. Select Flash storage device
      3. In the Port power limit(mA) drop-down list box, select 500


        Figure 17: USB Controller Properties Dialog Box
      4. Click OK to return to the Policy Editor window.

        Note: Steps 5 and 6 are optional, for the adding a ‘USB Storage’ icon to the Taskbar. Skip to step 7 to complete process.
      5. In the right pane, double click on Add Icon ‘USB Storage’ to Taskbar Notification Area.


        Figure 18: Policy Editor Window - Peripheral Port Settings
      6. In the Add Icon ‘USB Storage’ to Taskbar Notification Area dialog box, select Enabled.


        Figure 19: Add Icon ‘USB Storage’ to Taskbar Notification Area Dialog Box
        1. Click OK to return to the Policy Editor window.
      7. In the Policy Editor window, on the File menu, click Exit to return to the
        <OU> Properties dialog box.
      8. In the <OU> Properties dialog box, click Close to complete the procedure and return to the Xcalibur Global Management Console.

    Process Outcome:

    • Xcalibur Global now has a policy that will create an RDP connection with access to local USB storage.
    • The policy is linked to the OU that was selected.
    • The policy will affect all devices within the OU and any child OUs (as long a there are no restrictions on policy inheritance).

    4. Movie

 
Copyright Chip PC. All rights reserved.